DRAFT
Lessons From Adopting Generative Testing
Over the past few months, I rewrote most of my test suite. It was a cleanup effort as well as a chance to rethink how I approach testing, something I’ve been neglecting for most of my programming career.
There were two main reasons for rewriting my tests. The first reason was that the codebase I’ve been working on has grown, and more people are now working on it, however the existing tests weren’t adequate. At the time, they were the largest source of tech debt in the project, and I’m mostly to blame for that… Most of the tests were half-broken, vibe-coded slop just there to satisfy Codecov. [1] [1]
The other reason was that I wanted to try generative testing. I’m a big fan of TigerBeetle and Antithesis, both well known for their focus on software correctness and rigorous testing. I’ve read many of their blog posts and learned a lot of techniques and ideas, which I’ve always wanted to apply to my own projects.
The combination of tech debt pressure and unsatisfied curiosity eventually pushed me to delete my existing tests and rewrite them the way I imagined they should be. This post goes through that process and what I learned from it.
Notes on Terminology
Before going into more details, I just want to clarify some terms I’ll use. There are a lot of overloaded terms in testing (and software in general), and people often use the same words to mean different things. You may disagree with these, that’s fine. This is just what I mean when I use them.
I use only two scopes for tests:
- Unit tests: Tests scoped to any component or subsystem of the full system. The size doesn’t matter. It can be a single function, a module, or a group of modules. Some people will call tests that span multiple units “integration tests”, but I disagree. That definition is too ambiguous. I use the term “integration” to describe a different concept.
- System tests: Tests scoped to the entire system. I also consider tests that replace production components with test versions to still be system tests, as long as the overall system is exercised as a whole.
I use the term integration tests for tests (any scope) that interact with “black boxes”, e.g. third-party services, filesystems, networks, databases, etc. Or, in functional programming terms, impure tests. Tests without “integration” in their name implicitly mean pure tests. Also, I use the term end-to-end (E2E) tests specifically for system-scoped integration tests.
Rethinking My Testing Approach
Before starting the rewrite, I spent some time thinking about how to approach it and what my tests should look like. As you can already tell from the title of this post, most of the rewrite involves writing generative tests.
Generative testing is basically a catch-all term for tests where you write code that generates test cases, instead of you specifying the test cases themselves. This includes randomised approaches like property-based testing or fuzzing, and non-random ones where you try every possible input.
Note, I’ll use the terms “PBT” and “fuzzing” interchangeably going forward. Both involve using randomised input to test some property of the system. There are subtle differences, but in practice they’re minor enough that I just consider them the same. [2] [2]
Here are some of the main ideas that guided the rewrite:
Properties Over Examples
Property-based testing (PBT) is a testing approach where you specify properties of your code and throw randomised input at it to break those properties. I’m not going to explain it in detail here as there are already plenty of good resources online, and I don’t have anything new to add. [3] [3] Here, I’ll just talk about my case for PBT.
While the system is still small, I wanted to catch most bugs early so they don’t compound as the system grows. The existing example-based tests are limited in this regard, as they only cover cases I already know. PBT is much more effective as they uncover cases and scenarios that we forgot or may never have thought of.
In other words, property-based tests find bugs; example-based tests catch regressions.
My plan was to replace most of the existing tests with property-based tests, keeping a few select example-based tests, which are still useful for:
- Smoke tests: Sanity checks of the happy path, sometimes including common error cases . I mainly use them for code that doesn’t need extensive testing, e.g. thin wrappers or simple glue code.
- Documentation: Example-based tests are more readable, so I leave some to illustrate API usage or internal behaviour.
- Regression tests: Dedicated tests to ensure new changes don’t reintroduce known bugs.
System-Wide Fuzzing
System tests are usually the most valuable as they validate your system as a whole. The hardest bugs usually emerge only when components are used together. PBT/fuzzing is scope-agnostic, so it makes a whole lot of sense to also apply it in system tests.
There are two approaches I went with for this: the infamous deterministic simulation testing (DST) and traditional full-system fuzzing. [4] [4]
DST is basically just a system-scoped property-based test. Sure, it involves extra steps like replacing non-deterministic components (e.g. network, disk, clock, etc.) with deterministic counterparts, but the overall flow is the same as regular fuzzing or stateful PBT. If you like to learn more about DST, I recommend reading Antithesis’s DST primer or Phil Eaton’s blog post.
The main pitch of DST is that it finds the most outlandish bugs for you while keeping them perfectly reproducible, but as I eventually learned, it’s not the silver bullet I initially thought it was. More on this later!
The other approach is an E2E test where we fuzz the system in its production configuration, i.e. replacing the non-deterministic components. This means that the test runs in wall clock time and that they may be flaky, but it provides more coverage as the bugs it catches may not show up in DST. This follows the same principles as TigerBeetle’s Vortex.
Testing with Intent
This isn’t related to generative testing, but I still think it’s worth including. One thing I started to pay more attention to now in my tests is the intent or thought behind it.
It’s a similar concept to design. If you read design case studies or write-ups, you might be surprised at the amount of thought put into seemingly trivial details. Every decision is made on purpose. It’s the same for code. I think through the program’s architecture and how to structure the code, but I’ve always neglected doing it for tests.
You may argue that tests already have a purpose by default, e.g. to verify correctness, catch regressions, etc. I’m talking about stuff beyond that. Stuff like:
- Is this test testing intended behaviour, or is it just copying your implementation? The latter gives you false confidence, e.g. you can cover every branch and still be wrong.
- How should I test this? Not everything needs the same level of testing. Sometimes a simple smoke test is enough vs a full-blown exhaustive test.
- Do I need a test for this? Do I care enough about this to add a test? Every code you add is code you have to maintain.
Thinking about a test’s intent also forces you to reason about the SUT. I treat it as a design exercise; others describe it like an experiment’s hypothesis. I’ve also started adding comments on my tests to make them easier for other developers to understand, e.g. why it exists, what behaviour/properties it checks, how it actually verifies them, etc.
The System Under Test
Here’s a brief overview of the SUT to give you context for the examples later. All examples in this post are drawn from Cardinal, the game server component of the World Engine stack. It’s written in Go.
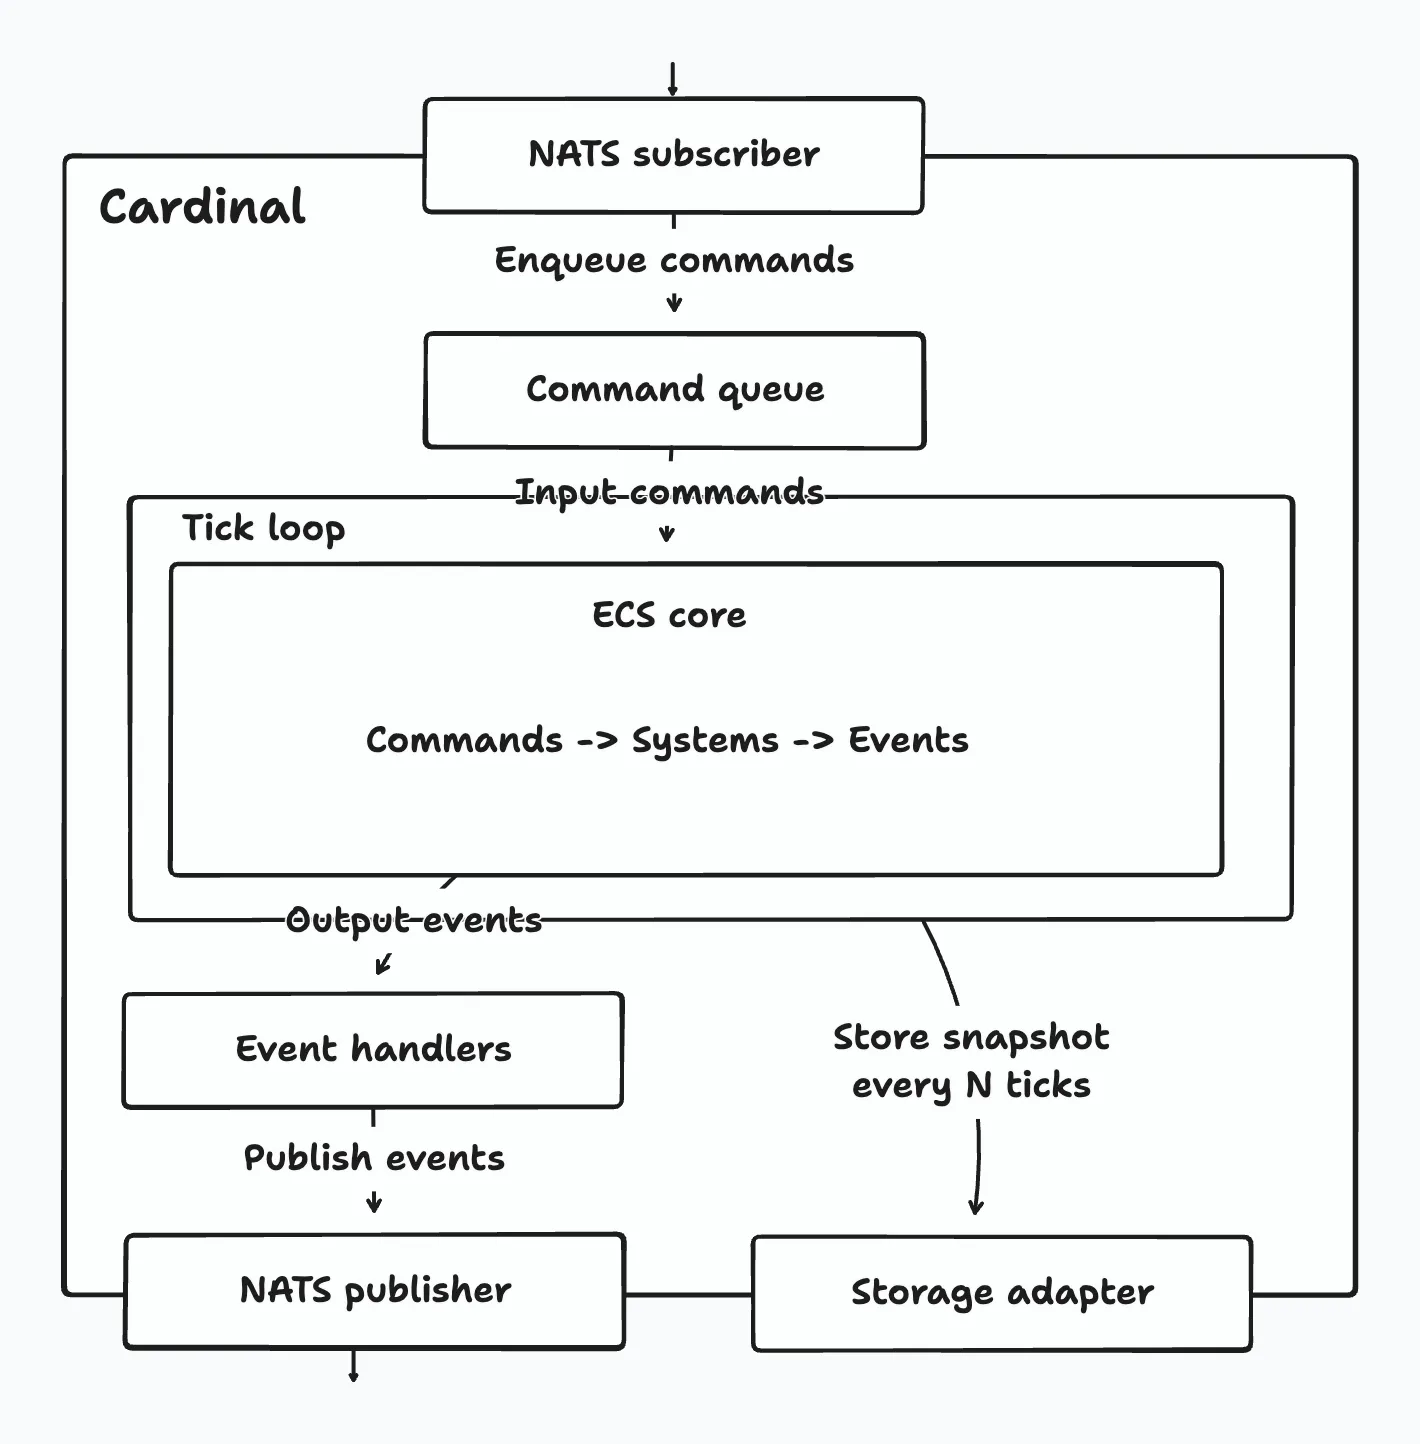
To be more specific, Cardinal is a tick-based game server framework built around an archetypal entity-component-system (ECS) core. Users implement game logic as systems, which are executed each tick to advance the world state. Cardinal communicates with other services through NATS and persists state using periodic snapshots.
Every tick, Cardinal injects commands received from external services (e.g. game clients) into the ECS core and runs the registered systems. These systems process commands, update the world state, and emit events. After the tick ends, event handlers publish the emitted events to NATS for other services to consume.
Here’s a diagram showing Cardinal’s high-level architecture:
Ok, hope that made sense. Now, on to the testing techniques.
Property-Based Testing Techniques
The hardest part of PBT is figuring out what properties to test, so I think one of the best ways to learn is to just see a lot of examples and start recognising patterns. Most of the techniques mentioned here came from TigerBeetle’s blog and source code, as that’s where I learned them. If you’re also interested in PBT/fuzzing, definitely give them a read!
Testing Data Structures
Cardinal is mostly made up of data structures. Testing them is a bit different from pure functions often used in PBT examples. With pure functions, you simply assert on the output. With data structures, there are two ways to do it:
- Assert internal properties (invariants). An invariant is a condition that must always be true. You can test these if your tests have access to internal fields, or by placing assertions directly in the implementation.
- Assert against a model. This is called model-based testing (MBT), or stateful PBT, state machine testing, differential testing, etc. In MBT, you compare the behaviour of your implementation against a model with the same semantics. The model can be a simplified implementation or a trusted reference, e.g. a data structure from your language’s standard library.
The idea is simple: run the same operations on both your implementation and the model, and assert that their states match.
I’ll use Cardinal’s componentManager to illustrate. Here’s what it looks like:
type componentManager struct {
	nextID    componentID            // The next available component ID
	catalog   map[string]componentID // Component name -> component ID
	factories []columnFactory        // Component ID -> column factory
}

// register registers a new component type and returns its ID.
func (cm *componentManager) register(name string, factory columnFactory) (componentID, error) {}

// getID returns a component's ID given its name.
func (cm *componentManager) getID(name string) (componentID, error) {}
While the manager does more internally, the bulk of its work is for component registrations, which basically involves mapping component IDs to their names. Since this behaviour is essentially like a map, I used Go’s built-in map as the model because it has the same semantics. Here’s a simplified version of the test:
func TestComponent_RegisterModelFuzz(t *testing.T) {
	prng := testutils.NewRand(t)
	impl := newComponentManager()
	model := make(map[string]componentID)

	operations := []string{opRegister, opGetID} // Just string constants
	for range 10_000 {
		switch testutils.RandOp(prng, weights) { // Pick a random operation
		case opRegister:
			name := randValidComponentName(prng)
			implID, implErr := impl.register(name, nil)
			modelID, modelExists := model[name]

			require.NoError(t, implErr)
			if modelExists {
        // Property: duplicate registrations return same ID.
				assert.Equal(t, modelID, implID)
			} else {
				model[name] = implID
			}
		case opGetID:
			name := randProbablyRegisteredComponentName(prng) // Can return non-existent keys
			implID, implErr := impl.getID(name)
			modelID, modelExists := model[name]

			// Property: getID returns same existence and value as model.
			assert.Equal(t, modelExists, implErr == nil)
			if modelExists {
				assert.Equal(t, modelID, implID)
			}
	}

	// Property: implementation matches model.
	assert.Len(t, impl.catalog, len(model))
	for name, modelID := range model {
		implID, err := impl.getID(name)
		require.NoError(t, err)
		assert.Equal(t, modelID, implID)
	}
}
Now you might be thinking: wait, doesn’t the implementation also use a map? The model is the same as the implementation. Your test essentially just compares two different maps here. Is this test even doing anything?
I had similar doubts too when I first wrote this. The benefits of this test aren’t obvious at first (to me at least), but it becomes clear once you change the implementation. For example, I could replace the map with an exotic data structure to get a 100x performance boost. This test will still work (as long as the semantics are the same, of course) because it tests the behaviour, not the implementation.
Note, MBT and internal assertions aren’t mutually exclusive. Ideally, you should use both. It’s not shown in the example above, but I also have assertions in the implementation to guard against invalid states. They check for different things: internal assertions ensure invariants hold, MBT ensures it behaves correctly.
Swarm Testing
I complement all my model-based tests with swarm testing. In the previous example, the test picks a random operation, where every operation has the same chance of being selected (a uniform distribution). In practice, this usually doesn’t lead to interesting scenarios.
The idea behind swarm testing is to randomise the test configuration. In our case, that means randomising which operations are performed. We can do this by picking a subset of all possible operations and assigning each a random weight (probability of being picked).
TigerBeetle uses Zig’s metaprogramming magic to automatically derive operations from a struct’s fields. You could probably do this in Go using runtime reflection, which I only realised while writing this… What I ended up doing was writing helper functions that take a hardcoded list of operations and randomises them:
type OpWeights = map[string]uint64 // Operation names -> weights

// RandOpWeights selects a random subset of operations and assigns random weights to them.
// At minimum 1 operation is enabled, at most all operations are enabled.
func RandOpWeights(r *rand.Rand, ops []string) OpWeights {
	assert.That(len(ops) > 0, "you need multiple operations to randomize")

	// Randomly select how many operations to enable (1 to len(ops)).
	numEnabled := 1 + r.IntN(len(ops))

	// Shuffle and take the first numEnabled operations.
	shuffled := slices.Clone(ops)
	r.Shuffle(len(shuffled), func(i, j int) {
		shuffled[i], shuffled[j] = shuffled[j], shuffled[i]
	})
	weights := make(map[string]uint64, numEnabled)
	for i := range numEnabled {
		weights[shuffled[i]] = uint64(1 + r.IntN(100))
	}
	return weights
}

// RandWeightedOp returns a random weighted operation from a OpWeights.
func RandWeightedOp(r *rand.Rand, ops OpWeights) string {
	var total uint64
	for _, weight := range ops {
		total += weight
	}
	pick := r.Uint64N(total)
	for op, weight := range ops {
		if pick < weight {
			return op
		}
		pick -= weight
	}
	panic("unreachable")
}
Here’s what the previous test looks like with swarm testing:
func TestComponent_RegisterModelFuzz(t *testing.T) {
	prng := testutils.NewRand(t)

	// Get a random weighted subset of your operations.
	operations := []string{opRegister, opGetID}
	weights := testutils.RandOpWeights(prng, operations)

	for range 10_000 {
		op := testutils.RandWeightedOp(prng, weights)
		switch op {
		case opRegister:
			// ...
		case opGetID:
			// ...
	}
	// ...
}
Initially, I thought regular MBT was enough, until I found a bug in one of my code. It’s the type of bug that can be found faster through swarm testing. Here’s a snippet of the buggy code from Cardinal’s event manager type. Can you spot the issue?
func NewManager(channelCapacity int) Manager {
	return Manager{
		channel: make(chan Event, channelCapacity),
		// ...
	}
}

// Enqueue enqueues an event into the Manager.
func (m *Manager) Enqueue(event Event) {
	e.channel <- event
}
The bug here is that Enqueue blocks when the channel capacity is reached.
The existing tests never found it, and it never happened during local development, so this bug went unnoticed for a long time. While I was writing the model tests, I experimented with increasing the number of operations. The tests eventually got stuck, revealing the bug.
This is exactly the kind of bug swarm testing helps catch. The original test runs both enqueue and dequeue operations, so the channel never fills up. If the dequeue operation is disabled, or is less likely to be picked, the channel quickly reaches capacity, and the bug becomes obvious!
After fixing the bug, I added a regression test to ensure it doesn’t happen again:
func TestEvent_EnqueueChannelFull(t *testing.T) {
	synctest.Test(t, func(t *testing.T) {
		const channelCapacity = 16
		const totalEvents = channelCapacity * 3 // Well beyond channel capacity

		impl := event.NewManager(channelCapacity)

		// Enqueue more events than channel capacity.
		go func() {
			for i := range totalEvents {
				impl.Enqueue(event.Event{Kind: event.KindDefault, Payload: i})
			}
		}()

		// Wait for all goroutines to complete or durably block.
		// If enqueue blocks, synctest.Test will detect deadlock and fail.
		synctest.Wait()

		// Extra property checks...
}
This test uses Go’s new testing/synctest to detect deadlocks. Unlike traditional timeout-based tests, goroutines spawned inside the synctest.Test bubble are tracked, which allows the runtime to detect deadlocks/leaks quicker and deterministically.
Concerns with Model-Based Testing
A big concern I had when writing these tests was how do I know whether my model is correct. I’m usually confident when the models are from Go’s standard library, since they’ve probably been tested to death by maintainers and by users in production.
But sometimes the standard library doesn’t have anything with the same behaviour as the data structure I’m testing. In these cases, I’m forced to write my own simplified model implementation. The hard part was verifying the model. How do I know if it’s correct? Do I test my model? What do I test it against? Should I test my tests? It’s turtles all the way down.
Turns out this is a well-known problem called the test oracle problem. A test oracle is basically what determines the correct output of a test. In example-based tests, you are the oracle because you specify the expected output. In MBT, the model is the oracle. As far as I know, there’s no complete solution this problem. [5] [5]
My only practical suggestion is to make your models (and tests in general) “obviously correct”. Prioritise simplicity and clarity above everything else. Keep the code short and easy to audit. It doesn’t matter if it’s slow or inelegant. Ideally, you should be able to convince yourself (and others) that the code is correct just by reading it.
Reducing the State Space
Some behaviours are surprisingly difficult to test, especially when they depend on many interacting variables. The number of possible variable combinations grows quickly, leading to a state space explosion. When this happens, uniform random sampling becomes less effective as most samples fall into “empty space” rather than edges and boundaries where bugs often hide.
Here’s an example. Cardinal’s ECS has the concept of archetypes. An archetype represents a unique combination of component types. It stores a list of entities belonging to that archetype as well as their component data. Here’s what it looks like:
type archetype struct {
	id         archetypeID      // Corresponds to the index in the archetypes array
	components bitmap.Bitmap    // Bitmap of components contained in this archetype
	rows       sparseSet        // Maps entity ID -> row index in entities and columns
	entities   []EntityID       // List of entities of this archetype
	columns    []abstractColumn // List of columns containing component data
}
When components are added to and/or removed from an entity, it is moved to a different archetype with the required component set. This operation involves creating the entity in the destination archetype, copying its components, and removing it from the source archetype:
// moveEntity moves an entity from one archetype to another.
func (a *archetype) moveEntity(destination *archetype, eid EntityID) {
	if a == destination {
		return
	}
	row, exists := a.rows.get(eid)
	assert.That(exists, "entity is not in archetype")

	// Create a new entity in the destination archetype with the id.
	destination.newEntity(eid)
	newRow, exists := destination.rows.get(eid)
	assert.That(exists, "new entity isn't created in the destination archetype")

	// Move entity's components to the new archetype.
	for _, dst := range destination.columns {
		for _, src := range a.columns {
			if dst.name() == src.name() {
				value := src.getAbstract(row)
				dst.setAbstract(newRow, value)
			}
		}
	}
	// Remove the entity from the current archetype, which also updates the row mapping.
	a.removeEntity(eid)
}
There are a lot of variables involved in a move operation:
- The source and destination archetypes.
- The number of components added, removed, or copied.
- The number of entities in both archetypes.
- Which entity is being moved.
If we only consider the source and destination archetypes, the input space is already huge. If there are
To make testing this more effective, I intentionally limited the size of the state space. The rationale is based on the small scope hypothesis, which argues that most bugs can be found within small input sizes. [6] [6] Larger inputs don’t necessarily lead to new execution paths. Borrowing the words of Matklad:
Most of the bugs involve small, tricky examples. If a sorting routine breaks on some array with ten thousand elements it’s highly likely that there’s a much smaller array (a handful of elements), which exposes the same bug.
With a smaller scope, we can now feasibly test all possible variable combinations exhaustively. Some of you might already know where I’m heading here. Yes, I’m talking about Exhaustigen. It’s a helper library for generating combinations of multiple variables exhaustively. I ported TigerBeetle’s Zig version to Go, which you can find here.
For my archetype move test, I reduced my variables to:
- Maximum 6 component types, which results in 64 possible archetypes. This produces
- 1-3 entities in the source and 0-2 entities in the destination. The source must have at least one entity to move.
- The entity to be moved is randomly chosen from the source. Entities and components are stored in slices under the hood. This verifies moves work correctly regardless of whether the entity is at the beginning, middle, or end of the slice.
With that, my number of test cases becomes:
Here’s a simplified version of the test:
func TestArchetype_MoveExhaustive(t *testing.T) {
	prng := testutils.NewRand(t)

	// Generate all possible subsets (archetype) with N component types.
	const maxComponents = 6
	pool := newArchetypePool(maxComponents)

	// Exhaustively test combinations of source * destination * entity count * moved entity row.
	gen := testutils.NewGen()
	for !gen.Done() {
		src := pool[gen.Index(len(pool))] // Randomize source
		dst := pool[gen.Index(len(pool))] // Randomize destination

		// Populate source with 1-3 entities, destination with 0-2 entities.
		countSrc := gen.Range(1, 3) // Randomize source entity count
		for eid := range countSrc {
			src.newEntity(EntityID(eid))
		}
		countDst := gen.Range(0, 2) // Randomize destination entity count
		for eid := range countDst {
			dst.newEntity(EntityID(countSrc + eid)) // Entity IDs are globally unique
		}

		// Pick which entity to move.
		row := gen.Index(len(src.entities)) // Randomize moved entity row
		eid := src.entities[row]

		if src == dst {
			assert.NotPanics(t, func() {
				src.moveEntity(dst, eid)
			}, "self move should be a no-op and must not panic")
			continue
		}

		src.moveEntity(dst, eid) // Do the actual move.

		// Assert properties here...
	}
}
Exhaustigen’s API is so nicely designed. It still amazes me that this small amount of code is enough to cover all variable combinations. It does some intricate machinery under the hood, so if you’re curious about how it works, check out the original blog post!
On Tooling
I didn’t use any third-party PBT libraries, e.g. Rapid, or Go’s testing/quick and testing.F. For my use cases, Go’s rand.Rand PRNG already provided most of the functionality I needed.
As I wrote the tests, I gradually extracted utilities once the patterns became clear. These helpers live in a small testutils package. The first thing I added was support for a global seed for the test PRNGs.
Since PBT relies on randomness, rerunning the same test can produce different results. To make failures reproducible, I seed all test PRNGs with the same value. If a test fails, I can reproduce it by rerunning it using the same seed:
TEST_SEED=0x0123456789abcdef go test ./...The seed is printed if you run the tests with the -v (verbose) flag. Here’s the code for it:
var Seed uint64 // Global test seed

func init() {
	Seed = uint64(time.Now().UnixNano())
	if envSeed := os.Getenv("TEST_SEED"); envSeed != "" {
		parsed, err := strconv.ParseUint(envSeed, 0, 64)
		if err == nil { // Only set using the env if it's valid
			Seed = parsed
		}
	}
	fmt.Printf("to reproduce: TEST_SEED=0x%x\n", Seed)
}

func NewRand(t *testing.T) *rand.Rand {
	t.Helper()
	// We derive a unique seed for each test by XOR-ing the global seed with a hash of the test name.
	h := fnv.New64a()
	_, err := h.Write([]byte(t.Name()))
	require.NoError(t, err)
	perTest := h.Sum64()
	return rand.New(rand.NewPCG(Seed^perTest, Seed^(perTest<<1)))
}Tests use NewRand as their source of randomness. Each test also uses a different seed, which is derived from the same original seed. This prevents parallel tests from generating the same random values. While this isn’t a problem for isolated tests, some tests share a common resource, e.g. a server or database. Using the same seed could cause them to pick the same resources, leading to collisions and tests corrupting other tests.
[7]
[7]
(Almost) Deterministic Simulation Testing
After I finished with the unit tests, I moved on to implement DST. Cardinal wasn’t initially designed with DST in mind, so it took quite a few refactors to get it mostly there. Almost all of the non-deterministic parts are stubbed out, except for the concurrent systems scheduler.
It’s a bit difficult to replace, so I just left it there. [8] [8] To guard against scheduler bugs that may not be 100% reproducible, I wrote extra tests to verify the scheduler’s internal concurrency works correctly. This way, I can still have confidence in its behaviour without needing to fully eliminate its non-determinism.
I’ve always thought it would be hard to implement DST, considering my first reference is TigerBeetle’s VOPR, which has a huge number of components and configurations. Then, I stumbled upon this blog post by Oskar Wickstrom about implementing a lightweight DST for Amp. [9] [9] It showed me that at its core, DST isn’t really a complicated concept, which made DST more attemptable.
I had the same realisation while writing the model-based tests. They looked a whole lot like the lightweight DST from the blog post. And they are! DST is basically just a bigger model-based test, with non-deterministic components stubbed out. Since I already wrote a lot of them, implementing the DST didn’t turn out to be too hard. [10] [10]
How it Works
I don’t remember where I first learned this, but TigerBeetle is structured so that it moves in fixed ticks, where each tick time is injected. In production use, this uses a regular wall clock, but in simulation, it uses a simulated clock. Well, Cardinal is a tick-based game server! It was already well-prepared for DST in this regard.
Cardinal only updates its state on every call to Tick:
// NOTE: The World type is Cardinal.

func (w *World) Tick(ctx context.Context, timestamp time.Time) {
	w.currentTick.timestamp = timestamp

	// Collect the commands for this tick.
	_ = w.commands.Drain()

	// Tick ECS world.
	w.world.Tick()

	// Emit events.
	if err := w.events.Dispatch(); err != nil {
		w.tel.Logger.Warn().Err(err).Msg("errors encountered dispatching events")
	}

	// Publish snapshot every N ticks.
	if w.currentTick.height%uint64(w.options.SnapshotRate) == 0 {
		snapshotCtx, cancel := context.WithTimeout(ctx, 2*time.Second)
		w.snapshot(snapshotCtx, timestamp)
		cancel()
	}

	// Increment tick height.
	w.currentTick.height++
}
In production use, Cardinal’s StartGame method handles its lifecycle. This basically runs an infinite loop, calling Tick every N seconds. For the simulation test, all we have to do is just replace StartGame and have the test harness control Cardinal using Tick.
Here’s a simplified version of the DST harness:
func RunDST(t *testing.T, setup func(*World)) {
	prng := testutils.NewRand(t)
	cfg := newDSTConfig(prng)
	fix := newDSTFixture(t, cfg, setup)

	// Add the world's commmands as operations in the dst config.
	cfg.addCommandsAsOperations(fix.world)
	cfg.log(t) // Log the test config

	// The main test loop:
	tick := 0
	for tick < cfg.Ticks {
		op := testutils.RandWeightedOp(prng, cfg.OpWeights)
		switch {
		case op == opTick:
			timestamp := time.Unix(int64(tick), 0)
			fix.world.Tick(context.Background(), timestamp)
			// Assert structural ECS invariants after every tick.
			ecs.CheckWorld(t, fix.world.world)
			tick++

		case strings.HasPrefix(op, opCommandPrefix):
			cmdName := strings.TrimPrefix(op, opCommandPrefix)
			cmd := fix.randCommand(t, prng, cmdName)
			require.NoError(t, fix.world.commands.Enqueue(cmd))

		case op == opRestart:
			fix.world.reset()

		case op == opSnapshotRestore:
			fix.world.reset()
			require.NoError(t, fix.world.restore(context.Background()))
		}
	}

	// Final validation after all randomized operations complete.
	ecs.CheckWorld(t, fix.world.world)
}
This test does a few things:
- Create a test configuration with random values. There are only a few ATM, and no fancy fault injections, but it’s a start.
- Initialises Cardinal with that configuration and replaces non-deterministic components (e.g. NATS handlers, snapshot storage) with deterministic versions that contains assertions. The non-deterministic parts are tested separately in integration tests.
- Register systems using the user-provided
setupfunction. I’ll talk more about this soon. - Extract type information from the command types used in the systems using reflection. We’ll use this to generate random commands to send to the Cardinal.
- Run for N ticks (configurable) and perform a random operation each time.
- We switch between several operations: tick the world, send a random command, reset the world, and restore from a snapshot. The tick operation is always enabled, but the rest are random (as in swarm testing).
- We validate the internal state every tick and at the end of the test.
While implementing this, there was a major design choice I had to make. Cardinal is a framework, and its input is user-provided game logic in the form of systems. I’ll refer to this set of systems as just “game”. The test harness above can only verify Cardinal’s internal invariants. It cannot verify whether the game is logically correct. I had to make a choice between:
- Keeping the harness specific to a single, hand-coded game designed to test Cardinal. This allows us to add more instrumentation to verify some extra invariants and also to validate the game logic, but also means it must be a private type to access the required internal fields.
- Make the harness game-agnostic and public. This gives a few benefits, namely, users can use it with their games, and we also get free inputs to test Cardinal on. We can only verify a subset of all our properties, but we’re more likely to get something we didn’t expect.
In the end, I went with the second design, mainly because we can explore more of the state space with it. If we had stuck with a single input, the harness might be biased.
So now, we have an importable DST harness that users can use, but not to test their game logic, rather to test that Cardinal works correctly with it. Here’s what its usage looks like:
import "github.com/argus-labs/world-engine/pkg/cardinal"

func YourTestDST(t *testing.T) {
	cardinal.RunDST(t, func(w *cardinal.World) {
		// Register your systems here...
		cardinal.RegisterSystem(w, system.PlayerSpawnerSystem, cardinal.WithHook(cardinal.Init))
		cardinal.RegisterSystem(w, system.CreatePlayerSystem)
		cardinal.RegisterSystem(w, system.RegenSystem)
		cardinal.RegisterSystem(w, system.AttackPlayerSystem)
	})
}
Expectations VS Reality
So initially, I tested with a simple game that I asked AI to write. I was really excited because of all the hype around DST, like how it seemingly found all the bugs in FoundationDB. The first time I ran it, the test froze. When I reran it, it froze again! My DST has found my first bug!
After some investigation, I found out that it was a bug in Cardinal’s scheduler. It’s a deadlock that happens only when the world is reset after an odd number of ticks. A ridiculous bug! I probably would’ve caught this myself in local development, but the fact that the simulator caught it this fast was amazing.
Then I ran the test again, a lot of times. Each iteration has a different seed and configuration. Nothing. Sometimes I get a bug, but it turned out to be a bug in the harness rather than Cardinal. I tried tuning the test configuration a little bit, but still nothing. At that point, I wasn’t sure what was wrong. Was my harness too simple to find more bugs? Or was my code just bug-free? Was it finding bugs but I didn’t have the correct assertions to catch them?
I don’t know the answer. And it seems I wasn’t the only one with this issue. I was watching the BugBash Podcast episode with the co-authors of DDIA (2nd edition), and Chris Riccomini talked about his experience adding DST to SlateDB. He mentioned things like DST being high-investment but low-return, didn’t explore that much state, and that it only found three known bugs. This matched perfectly with my (short) experience!
Chris also mentioned that a better approach might be to apply DST on subcomponents much earlier in the process instead of going all in with full-system DST, which would’ve given more value much earlier. Coincidentally, this is what I did (if you count the model-based tests as DST), and it also aligns with my experience. I had caught several bugs from those tests. It’s probably why my DST didn’t catch many bugs, but that’s just my wishful thinking.
I’ll also add this quote from Will Wilson, the CEO of Antithesis:
The biggest challenge of DST in my experience is that tuning all the random distributions, the parameters of your system, the workload, the fault injection, etc. so that it produces interesting behaviour is very challenging and very labor intensive. As with fuzzing or PBT, it’s terrifyingly easy to build a DST system that appears to be doing a ton of testing, but actually never explores very much of the state space of your system. At FoundationDB, the vast majority of the work we put into the simulator was an iterative process of hunting for what wasn’t being covered by our tests and then figuring out how to make the tests better. This process often resembles science more than it does engineering.
I’m still not giving up, though. My DST harness is still small, which means it can only grow from here. I already have several improvements in mind, so I’ll stick with it for a bit longer.
End-to-End Fuzzing
The final test I added was the E2E tests. This actually followed a similar structure to the DST, where we set up Cardinal with user-provided game logic and bombard it with randomised commands. The biggest difference is that it runs with the same, non-deterministic configuration as it would in production.
The actual harness code is pretty gnarly, so here’s an extremely simplified version of it:
func RunE2E(t *testing.T, setup E2ESetupFunc) {
	prng := testutils.NewRand(t)
	cfg := newE2EConfig()
	fix := newE2EFixture(t, setup)

	// Add the world's commmands as operations in the dst config.
	cfg.addCommandsAsOperations(fix.world)
	cfg.log(t) // Log the test config

	// Start the world's run loop in a background goroutine.
	ctx, cancel := context.WithCancel(context.Background())
	runErr := make(chan error, 1)
	go func() {
		runErr <- fix.world.run(ctx)
	}()

	deadline := time.After(cfg.Duration)
sendLoop:
	for {
		select {
		case <-deadline:
			err := stopWorld()
			if err != nil && !errors.Is(err, context.Canceled) {
				t.Fatalf("world.run returned unexpected error: %v", err)
			}
			break sendLoop
		default:
			name := testutils.RandWeightedOp(prng, cfg.CommandWeights)
			cmd := fix.randCommand(t, prng, name)
			fix.sendCommand(t, cmd)
		}
	}

	// Final validation after the world has fully stopped.
	ecs.CheckWorld(t, fix.world.world)
}
All this does is run Cardinal in a separate goroutine and send it randomised requests. Unlike in DST, where you control the number of ticks to run, here you control the test duration. Since it uses wall clock time, it’ll run much slower than other tests. This is why I made the E2E tests disabled by default. To run them, pass the -e2e.run flag to go test.
The usage API is also similar to DST, but instead of passing a function to register systems, you’d return the actual cardinal.World instead. In DST, we randomise Cardinal’s config, but in the E2E test we want it to have the same config as production to test more realistically:
import "github.com/argus-labs/world-engine/pkg/cardinal"

func TestE2E(t *testing.T) {
	cardinal.RunE2E(t, func() *cardinal.World {
		world, err := cardinal.NewWorld(cardinal.WorldOptions{
			// Your world configuration...
		})
		require.NoError(t, err)

		// Register systems here...

		return world
	})
}
What’s Next?
Phew… That was long. I had cut out a lot of things, including a section on testing concurrent code, but I still ended up with almost 7000 words. If you read the entire thing, big props to you.
Here’s the source code if you want to take a closer look. After all this, I’m even more excited about software correctness. There are so many more things I want to try, e.g. improve my DST harness, test using a deterministic hypervisor :), formal methods, etc.

Only the tests were slop, I actually put a lot of thought into the code itself! ↩︎
I like comparing PBT and fuzzing to convergent evolution, which is when species of different lineages evolve similar features. PBT came from functional programming, fuzzing came much earlier from systems/security. The approach is similar, but their focus is different (program correctness vs security issues). Yes, I got this from Antithesis. ↩︎
I recommend reading Antithesis’s PBT primer first, and then F# for Fun and Profit’s PBT series for some more practical tips. ↩︎
My real reason for adopting DST is just because I think it’s cool. It’s what got me interested in TigerBeetle in the first place. ↩︎
There are some approaches that address this problem (somewhat), e.g. metamorphic testing. It solves this by using oracles derived from the tests themselves (through special properties called metamorphic relations), but it’s not a universal solution. ↩︎
this is probably why shrinking in pbt works. while the original intent is too create a simpler representation for debugging, the fact remains that the same bugs found in larger inputs can usually be reproduced in smaller ones. ↩︎
I tried to keep the explanation short earlier, so here’s a concrete example. Some of my integration tests share a single, in-memory NATS server. When tests used the same seed, I noticed they would sometimes fail. The reason for this is that multiple tests were accessing the same NATS subjects, even though the tests were meant to be isolated. Using a different seed for each test solves this.
Also, before the rewrite, each test would create its own NATS server. This is simpler, but it fails when there are a lot of parallel tests. The tests would use up all memory in CI (and sometimes in my local machine) and OOM. ↩︎
It’s technically easy to replace, and I’m also considering replacing it with a simpler, sequential version, but first, I need to do some benchmarks with a lot of different system schedules to understand the implications. It’ll take a while, so I decided to just leave it there so I could get the DST set up first. ↩︎
Which is also, my coding agent of choice :) ↩︎
There’s another way to do DST in Go. This blog post by Polar Signals explains how they implemented DST in Go by compiling their program to WASM and (slightly) modifying the Go runtime. ↩︎